Beginners Guide to Photo Editing
One thing about me is that I love to edit my pictures and post them on Instagram. In this post I have included my personal editing tips and tricks below as well as some ideas of how you can make create a more attractive Instagram feed yourself!
Use the same filters for all your pictures, and create a similar tone & style for all of them. There are so many apps you can download that basically have the same editing tools, but here are just a few that I like best:
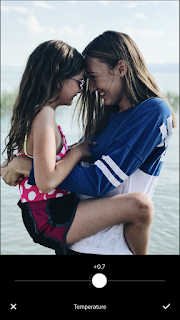
VSCO: They have really good filters that you can edit and adjust the way you want. Here is a pretty simple step-by-step edit on one of my pictures:
This is the before and after side by side. At a glance you can see that the photo on the right is brighter, warmer, and more crisp.


I started out by cropping the picture on the sides a little bit to make it more symmetrytrical and balanced. Then I upped the exposure, contrasted just a tad, clarified and sharpened, and then saturated it and made it warmer by bringing up the temperature.
................................................
Snapseed: This is kinda like VSCO, in a way, but it has it's own style and specific tools that VSCO lacks. Sometimes I will edit a picture here first, and then take it to VSCO and put a light filter on it. One of the main reasons why I love this app is because it has the Dodge & Burn effect. This effect allows you to brighten targeted areas of a photo which creates that fresh white and clean look. I actually discovered this cool tip from another blog, and I have applied her tips in my editing. Feel free to check her page out too because she shows some step-by-step editing, and sometimes it's nice to see how something works from more than one source. Happy Grey Lucky
I took this photo on a white chair by the window to bring in the natural lighting. This is the before and after at a glance.
I started out by doing the normal editing routine of brightening the image, adding some contrast, saturation, more ambience, and I brought up the highlights. Once I got to the temperature, I actually cooled the image down slightly because that helps get rid of the unwanted orange tones in the photograph. Then I went to the brush tool and used the Dodge & Burn feature. I like to see where I am putting this effect, so I click the little eye icon which turns the marked areas red. After I am done with that, sometimes I will end up going back and doing a few more minor adjustments such as adding more contrast.
................................................
Adobe Photoshop Lightroom: I love Lightroom. I actually use this program mostly on my computer, which includes more advanced editing tools, but the free app still has a lot of the features that the computer program has such as the adjustment brush. I like the adjustment brush for controlling skin tones and sharpness. You can adjust the temperature and saturation on a specific area without changing the overall look of the photo. I really like this program's sharpness feature. VSCO has the sharpen and clarity tools, but I personally like the sharpness effect that Lightroom offers.
This is an edit I did in Lightroom using a preset called SP - 05 from the NATE Cam Starter Pack SP - 05 . These presets are VSCO inspired, but they still leave you with lots of room to play with the adjustments and skin tones.
................................................
Jessica Whitaker talks about different photography tips and tricks in her Youtube videos. In one of them she mentioned a couple of apps she uses when it comes to the Instagram "flow" that I have applied into my Instagram lifestyle:
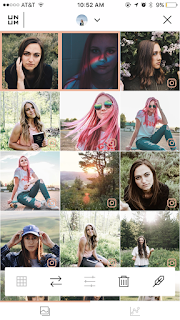
UNUM: This is the ultimate flow planning app. You can place pictures on a pretend grid next to your real Instagram feed, and you can see how your pictures will look if you post them. You can also edit your pictures on there. They have a blur tool, a focus tool, as well as blemish and whitening tools.
The photos with the Instagram icon on them are the ones that I have already posted. You can use that squiggly line feature on the black toolbar to shift the photos down to view the feed as a whole. Once you place pictures on the grid you can select a few and switch them around in different locations on your potential feed.
When To Post: This app tells you what times of the day would be best to post so you can get the most engagement on your pictures.
I find all of these apps and programs to be super helpful and I would definitely recommend them. If you have any questions about how to use them, feel free to connect with me through my Instagram, Facebook, email, or leave a comment on this post.
Good luck with your photo editing! I wish you (and your Instagram😉) the best!
xx
Kaitlyn


Comments
Post a Comment